Category: ColdFusion

  • ColdFusion 11 Hot Fix 1 and Connectors

    There it is! Hotfix 1 – The first update for ColdFusion 11.
    The technote detailing the release is here, https://helpx.adobe.com/coldfusion/kb/coldfusion-11-update-1.html#

    The update packs a handful of fixes to critical bugs, with two of them being on the connector. I will be detailing these two fixes here,

    1. IIS worker process hangs when IIS site config is changed – Bug# 3777189
      The bug details the issue where IIS worker process (w3wp.exe) hangs or loads for a prolonged time, and eventually times out after a configuration change is made on IIS manager. This was a serious bug, and has been confirmed to be fixed in the update.

    2. First request slow on Windows – Bug# 3758172
      The bug basically points out that the first request, when configured with IIS, takes a large amount of time to render. This would happen after the ColdFusion server has restarted, or if the IIS worker process has returned from the idle state. This bug too, is confirmed to be fixed in the update.

    An important factor to consider, is that the connector bits already configured on your environment need to be replaced with the fixed one’s. What this means is that the existing connector would have to be removed and reconfigured for the fixes to be in place. Just ensure, all your custom connector configurations are backed up before you reconfigure!
  • ColdFusion 11 – Manually remove connector configuration

    This post deals with removing connector residues on web-servers, IIS and Apache, if and when the wsconfig utility is not available for un-configuring existing connector configurations.

    Connector residues are left behind with incorrect uninstallation of ColdFusion Getting Started servers, or more simply, the ZIP Installers. The right way to get rid of a Getting Started server, would be to check and remove any existing connector configurations, and then delete the extracted ColdFusion directory. Failing to do this may result in connector residues strewn on IIS or Apache, and future connector configurations may behave unexpectedly, or on the extreme end, stop the web server from firing up!

    Below are a handful of steps to remove ColdFusion connector residues on Internet Information Services (IIS):

    1. Verify ColdFusion connector is the culprit before proceeding
    2. Open Internet Information Services (IIS) Manager
    3. Select Server / Machine Name > Default Document and delete entry for index.cfm
    4. Select Server / Machine Name > ISAPI and CGI Restrictions and delete entries that point to the ColdFusion install directory
    5. Select Server / Machine Name > ISAPI Filters and delete entries that point to the ColdFusion install directory
    6. Select Server / Machine Name > Handler Mappings and delete entries with paths, ‘*.cfc’, ‘*.cfm’, ‘*.cfml’, ‘*.cfr’ or ‘*.cfswf’
    7. Repeat the steps 3 to 6 for all sites configured with ColdFusion
    8. Delete contents of the /ColdFusion11/config/wsconfig/CONFIGURATION_NUMBER/ directory, if it contains filenames starting with ‘isapi’
    9. Restart IIS / sites
    10. Delete ‘.air’ mapping from MIME Types, if it causes any issues

    Further, here are some steps to remove ColdFusion connector residues on the Apache Web Server:

    1. Locate the Apache conf directory
    2. Find the mod_jk.conf file. Delete it
    3. Open the file, httpd.conf (apache2.conf on Ubuntu)
    4. Scroll down right to the bottom. Remove the entry that refers to the mod_jk.conf file
    5. Delete contents of the /ColdFusion11/config/wsconfig/CONFIGURATION_NUMBER/ directory, if it contains filenames starting with ‘mod_jk’
    6. Restart Apache
  • ColdFusion 11 – PDF Service prerequisites on Linux

    If you are planning to use PDF services on a Linux box with ColdFusion 11, you would need a set of packages to be preinstalled, and would also need to import a set of fonts onto your machine. Though this is called out specifically in the Adobe Live Cycle Documentation, I decided to post a set of out-of-the-box commands that get these prerequisites in place without hassles. These commands use the yum or apt-get package managers to install prerequisites and have been tested on RHEL 6+ and Ubuntu 13.10+.


    RedHat, and everything YUM powered,
    Execute the below commands from a terminal, or run it from a script file on an RHEL, or any machine with valid yum configurations.

    yum -y install glibc.i686 zlib.i686 libX11.i686 ia32-libs expat.i686 freetype.i686 nss-softokn.i686 libxcb.i686 libXau.i686 libXext.i686 libSM.i686 libXrandr.i686 libXrender.i686 libXinerama.i686
    yum -y groupinstall "X Window System"
    wget http://cgit.freedesktop.org/xorg/font/ibm-type1/snapshot/font-ibm-type1-1.0.3.tar.gz
    tar -zxvf font-ibm-type1-1.0.3.tar.gz
    cd font-ibm-type1-1.0.3
    mv * /usr/share/fonts/
    cd ..
    rm -rf font-ibm-type1-1.0.3
    rm -rf font-ibm-type1-1.0.3.tar.gz


    Ubuntu
    Execute the below commands from a terminal, or run it from a script file on an Ubuntu with apt-get repositories configured.

    #!/bin/sh
    
    export DEBIAN_FRONTEND=noninteractive
    
    # Add dependencies for PDF
    dpkg --add-architecture i386
    apt-get update
    
    apt-get --assume-yes install glibc-2.*
    apt-get --assume-yes install lib32z1
    apt-get --assume-yes install lib32ncurses5
    apt-get --assume-yes install libbz2-1.0:i386
    apt-get --assume-yes install lib32z1-dev
    apt-get --assume-yes install libbz2-dev:i386
    apt-get --assume-yes install zlib1g
    apt-get --assume-yes install libx11*
    apt-get --assume-yes install lib32z1
    apt-get --assume-yes install lib32ncurses5
    apt-get --assume-yes install libbz2-1.0:i386
    apt-get --assume-yes install libexpat1
    apt-get --assume-yes install libexpat1:i386
    apt-get --assume-yes install libfreetype6:i386
    apt-get --assume-yes install x-window-*
    apt-get --assume-yes install libnss-mdns:i386
    apt-get --assume-yes install libxcb1-dev:i386
    apt-get --assume-yes install libxcb1-dev
    apt-get --assume-yes install libxext6
    apt-get --assume-yes install libxext6:i386
    apt-get --assume-yes install libsm6
    apt-get --assume-yes install libsm6:i386
    apt-get --assume-yes install libxrandr2
    apt-get --assume-yes install libxrandr2:i386
    apt-get --assume-yes install libxrender1
    apt-get --assume-yes install libxrender1:i386
    apt-get --assume-yes install libxinerama1
    apt-get --assume-yes install libxinerama1:i386
    wget --no-check-certificate  https://cgit.freedesktop.org/xorg/font/ibm-type1/snapshot/font-ibm-type1-1.0.3.tar.gz
    tar -zxvf font-ibm-type1-1.0.3.tar.gz
    cd font-ibm-type1-1.0.3
    mkdir -p /usr/share/fonts/
    mv * /usr/share/fonts/
    cd ..
    rm -rf font-ibm-type1-1.0.3
    rm -rf font-ibm-type1-1.0.3.tar.gz
    
    rm -rf /var/lib/apt/lists/*


    Hope this helps!

    ————-

    [8th May 2018]
    Updated source for Ubuntu. Breaking up commands seems to be necessary.

    [4th Jul 2017]
    Updated source for Ubuntu based on the comments by, KnuBew and David Belanger.
    > dpkg –add-architecture i386
    > apt-get update

  • Fixing the Null Pointer Exception on ColdFusion

    EDIT: This post was originally written with only MacOS in mind, and has been updated to serve as a generic solution

    Null pointer exceptions., the NPE., can be a pain – especially with no debugging environment in place. Here’s a possible solution to one such NPE thrown by ColdFusion.

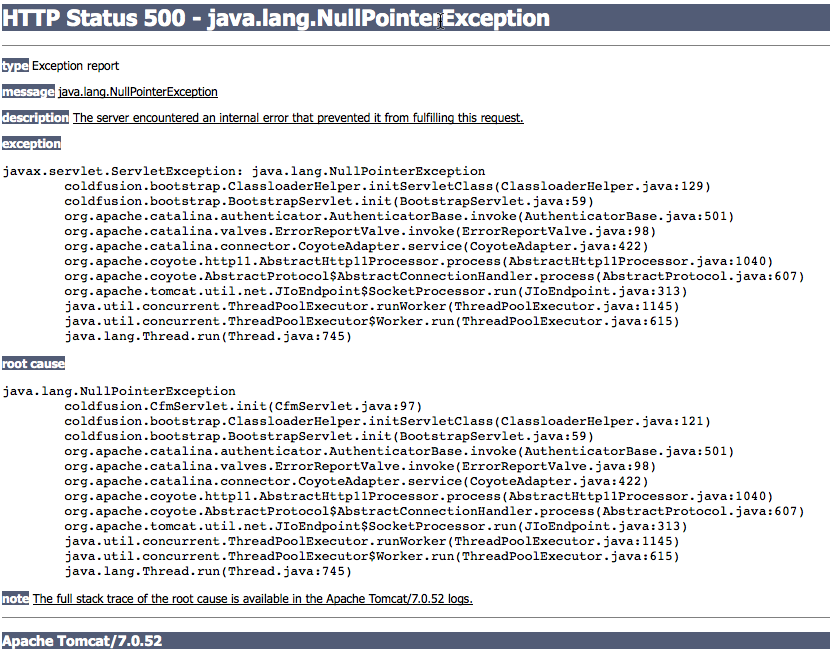
    Right after installing ColdFusion, if you are confronted with a HTTP 500 Error and a Null Pointer exception on accessing the administrator, this post is for you!

    Here is a more descriptive screenshot of the problem at hand.
    MacHostnameError


    This problem is most likely caused due to a missing hostname mapping in the hosts file. The hosts file needs to contain localhost, or the machine hostname if that is how ColdFusion is accessed through the browser. The solution for both, is below. An alternate way to identify this problem, is to check coldfusion-out.log entries. The licencing service would have failed to start with incorrect hostname mappings.

    Generic solution for all machines
    Edit the hosts file to see if a mapping for localhost and the machine hostname exists.

    Location of the hosts file on Windows: C:\Windows\System32\drivers\etc\hosts
    Location of the hosts file on Linux: \etc\hosts

    If not, add the statement below,

    127.0.0.1     localhost machine-hostname


    An easier solution on Mac
    Verify this is the case by running the below command. The result will likely not include “localhost”.

    sudo scutil --get HostName

    An easy way to fix this problem, is to run the below command, and restart ColdFusion.

    sudo scutil --set HostName localhost


    Voila! ColdFusion administrator must be accessible with the localhost / machine hostname now.