Tag: Connector

  • ColdFusion 11 Hotfix 5 and ColdFusion 10 Hotfix 16 are out!

    Hotfix 5 for ColdFusion 11, and Hotfix 16 for ColdFusion 10 are out, and fix close to 150 bugs collectively!

    Connector fixes for IIS are available for ColdFusion 11, and that would imply the need to reconfigure connectors if you are on a ColdFusion 11 configured with IIS. ColdFusion 11 also packs Apache 2.4.10 support. However, you would not need to reconfigure Apache connectors unless Apache 2.4.10 support is required.
    No connector reconfigurations are required for ColdFusion 10.

    Find the technotes below,
    ColdFusion 11 Update 5: https://helpx.adobe.com/coldfusion/kb/coldfusion-11-update-5.html
    ColdFusion 10 Update 6: https://helpx.adobe.com/coldfusion/kb/coldfusion-10-update-16.html

    More details are seen on the ColdFusion Blog.

    Appreciate your feedback!

  • ColdFusion and Nginx

    Nginx is that popular webserver that’s been increasingly eating up the webserver market share. Wikipedia says over 30% of the top 100K sites run on Nginx. The Nginx wiki speaks of the webserver as a high-performance HTTP server and reverse proxy, as well as an IMAP/POP3 proxy server.

    The most striking feature of Nginx though, is that it adopts a non-blocking, event driven architecture to serve requests. Unlike Apache or IIS, which spawn a new process (or worker) or thread to handle new requests, Nginx is single-threaded and new connections are placed within an event loop, with requests processed asynchronously. This provisions memory and CPU usages to be consistent, irrespective of the number of connections. Simultaneous connections on Apache and IIS on the other hand, would incrementally hog resources, upping the memory footprint. Wikipedia notes Nginx to use ~2.5 MB memory per 10k inactive HTTP keep-alive connections.

    Now, to make sense of all this in ColdFusion’s context, let’s see how Nginx works with ColdFusion.
    This post walks you through two aspects,

    1. Configuring Nginx to serve ColdFusion requests
    2. Using Nginx as a load balancer between CF instances


    Configure Nginx to serve ColdFusion requests

    Now, there are two ways (you will figure out there are actually three ways) to get ColdFusion configured with Nginx – with the AJP protocol as done for Apache or IIS, or using Nginx as a reverse proxy to ColdFusion.

    Through the AJP Protocol
    Nginx speaks only HTTP, FastCGI, SCGI, uWSGI and MemCache – hence, no native support for AJP. We will use a third party AJP module to connect to ColdFusion.

    Configuring ColdFusion with Nginx over AJP comes with limitations. A modified Tomcat Connector is used while configuring through the ColdFusion Connector, and things could go haywire, to an extent that something as simple as CGI variables could break!
    The AJP Module is also not listed in on nginx.org, though Nginx maintains the list is community updated.
    That leaves us with the option of reverse proxy.

    As a Reverse Proxy
    Configuring a reverse proxy is extremely simple. Directive’s for a reverse proxy to Apache are already in place in the vanilla configuration file. All you need to do is edit it!
    Here’s a configuration file for an Nginx server running on port 85, and a ColdFusion server running on port 8501.

    #user  nobody;
    worker_processes  1;
    events {
        worker_connections  1024;
    }
    http {
        include       mime.types;
        default_type  application/octet-stream;
        sendfile        on;
        #tcp_nopush     on;
        keepalive_timeout  65;
        #gzip  on;
        server {
            listen       85;
            server_name  localhost;
            #charset koi8-r;
            #access_log  logs/host.access.log  main;
            location / {
                root   html;
                index  index.html index.htm index.cfm;
            }
            #error_page  404              /404.html;
            # redirect server error pages to the static page /50x.html
            #
            error_page   500 502 503 504  /50x.html;
            location = /50x.html {
                root   html;
            }
            # proxy the CFC, CFM scripts to ColdFusion listening on 127.0.0.1:8501
            #
            location ~ \.cfm$ {
                proxy_pass   http://127.0.0.1:8501;
            }
            location ~ \.cfc$ {
                proxy_pass   http://127.0.0.1:8501;
            }
        }
    }
    

    The complete configuration file can be downloaded from, https://bitbucket.org/immanuelnoel/coldfusion-nginx-proxy

    A handful of limitations exist here too.

    1. Since the connector does not come into play, ColdFusion is unable to process CFM / CFC files that exist within the Nginx webroot
    2. SES URLs – again introduced by ColdFusion connector, are not available
    3. CGI variable for server port shows up ColdFusion port

    Another way to reverse proxy
    To have absolute support for ColdFusion, while also extracting Nginx’s powerful static file handling, you might have to configure Nginx as a reverse proxy to Apache, and have ColdFusion configured with Apache. Having Nginx frontend Apache, is a common use-case, especially when the requirement is to absolutely use Apache (for things like directory level configurations – Nginx has nothing on the lines of .htaccess), while also benefiting from Nginx’s serviceability. The idea here, is to have static resources served by Nginx, with Nginx forwarding requests it doesn’t understand to Apache, and eventually, Apache ends up serving only ColdFusion requests.

    Before you start to contemplate whether or not this is good, let’s look at some numbers.
    I ran a quick test for the request roundtrip for 1000 requests in the below scenarios. In the first case, a CF script that dumps CGI variables was used, and in the second, a CFM that loads a large image, dumps now(), and dumps CGI variables was used.

    Request Flow cfdump(CGI) (seconds) image, now(), cfdump(CGI) (seconds)
    Client -> ColdFusion 57.395676 43.312573
    Client -> Nginx -> ColdFusion 42.997750 40.502565
    Client -> Apache -> ColdFusion 50.277571 41.127564
    Client -> Nginx -> Apache -> ColdFusion 46.539902 45.562761

    Now, take a call whether or not the last line affects you. If not, the only change you would need to do to the above configuration file, is swap 8501 with 80 (Assuming Apache is running on 80), and configure Apache with ColdFusion.


    That’s it! Now, if one of you have Nginx in production, do share your experiences about how it fares in comparison to Apache.

  • Busting the HTTP Error 500.19 on ColdFusion 11 + IIS

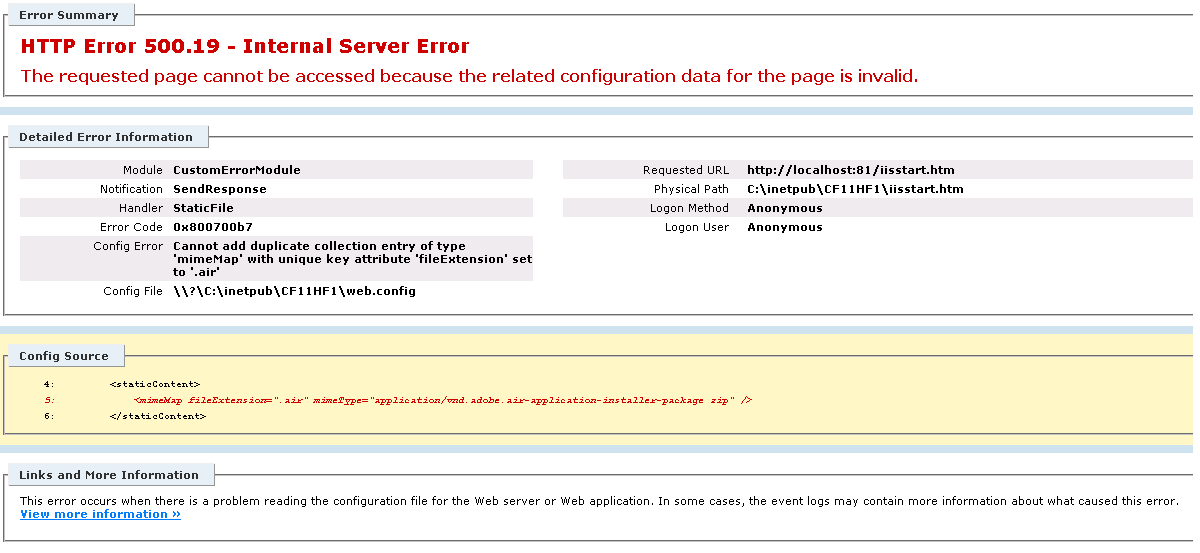
    Here’s a little trouble shooting tip to bust an IIS HTTP Error 500.19 (Internal Server Error) that may pop up when IIS is configured with ColdFusion 11. The error mostly occurs when IIS is unable to interpret configurations specified in the web.config file.

    In this post I speak about fixing a specific cause of a 500.19, while the ideology can be applied to fix similar errors.

    When a connector is configured with IIS, ColdFusion attempts to register required MimeTypes in IIS. MimeTypes are registered to the server, or to specific site based on the options selected during connector configuration. Now, there is a good possibility some of these MimeTypes may be already added by other third party applications. Now what happens is a debacle. ColdFusion attempts to register a MimeType, and IIS puts this into a web.config file, and since this entry is actually a duplicate, IIS fails to serve any pages off the affected sites, and throws a 500.19.

    Here is one such error. The duplicate MimeType added in this case, is .air
    MimeError

    All we need to do to get around this error, is to either unconfigure the connector, navigate to IIS Manager > Site in Consideration > MimeTypes, remove the entry that references .air extension, and reconfigure the connector, OR, If you are confident enough to play around with you server, the web.config file itself can be edited to reflect appropriate settings.

    While that should get rid of the 500.19, this particular issue is being tracked, and will be resolved in a future release of ColdFusion.

  • ColdFusion 11 – Manually remove connector configuration

    This post deals with removing connector residues on web-servers, IIS and Apache, if and when the wsconfig utility is not available for un-configuring existing connector configurations.

    Connector residues are left behind with incorrect uninstallation of ColdFusion Getting Started servers, or more simply, the ZIP Installers. The right way to get rid of a Getting Started server, would be to check and remove any existing connector configurations, and then delete the extracted ColdFusion directory. Failing to do this may result in connector residues strewn on IIS or Apache, and future connector configurations may behave unexpectedly, or on the extreme end, stop the web server from firing up!

    Below are a handful of steps to remove ColdFusion connector residues on Internet Information Services (IIS):

    1. Verify ColdFusion connector is the culprit before proceeding
    2. Open Internet Information Services (IIS) Manager
    3. Select Server / Machine Name > Default Document and delete entry for index.cfm
    4. Select Server / Machine Name > ISAPI and CGI Restrictions and delete entries that point to the ColdFusion install directory
    5. Select Server / Machine Name > ISAPI Filters and delete entries that point to the ColdFusion install directory
    6. Select Server / Machine Name > Handler Mappings and delete entries with paths, ‘*.cfc’, ‘*.cfm’, ‘*.cfml’, ‘*.cfr’ or ‘*.cfswf’
    7. Repeat the steps 3 to 6 for all sites configured with ColdFusion
    8. Delete contents of the /ColdFusion11/config/wsconfig/CONFIGURATION_NUMBER/ directory, if it contains filenames starting with ‘isapi’
    9. Restart IIS / sites
    10. Delete ‘.air’ mapping from MIME Types, if it causes any issues

    Further, here are some steps to remove ColdFusion connector residues on the Apache Web Server:

    1. Locate the Apache conf directory
    2. Find the mod_jk.conf file. Delete it
    3. Open the file, httpd.conf (apache2.conf on Ubuntu)
    4. Scroll down right to the bottom. Remove the entry that refers to the mod_jk.conf file
    5. Delete contents of the /ColdFusion11/config/wsconfig/CONFIGURATION_NUMBER/ directory, if it contains filenames starting with ‘mod_jk’
    6. Restart Apache
  • The MySQL/Python Connector Saga

    This post is written with Python 3.4 in consideration, and may, or may not apply to Python 2.x

    Numerous blogs / forums suggest umteen non-working solutions to get the MySQL Connector/Python to work. All I got out of those, is a wasted day, and this small little comment by ACyclic on StackOverFlow.

    python

    A prerequisite for MySQL Connector/Python to work seamlessly on linux machines, is to have the packages (but not limited to) SSL and ZLIB. Installing the connector itself does not throw errors, but importing mysql.connector does. It would ideally error out with exceptions like, “ImportError: No module named HTTPSConnection” or “ImportError: No module named zlib”. Now, only one of these errors will come up at a time, and you would need to recompile Python for subsequent attempts.

    Experimenting with Python command line parameters, such as –with-ssl, –with-zlib, etc., will not work since Python does not depend on any such parameters, but instead, is intelligent enough to automatically install packages if support exist i.e., automatically installs SSL modules if the SSL packages are found on the machine. This check exists in the setup.py file.

    The Solution is to have the below packages installed before compiling Python.

    1. mod_ssl
    2. openssl
    3. openssl-dev / openssl-devel
    4. zlib
    5. zlib-dev / zlib-devel

    To verify package dependencies are met, search the setup.py file for the missing module, and the subsequent code will likely tell you how Python determines if a package is installed.

    Here’s a small piece of code to help you test the connector installation.

    import mysql.connector
    cnx = mysql.connector.connect(user='username', password='password', host='localhost', database='dbname')
    cursor = cnx.cursor()
    select = "SELECT * FROM someTable"
    cursor.execute(select)
    for row in cursor:
    	print(row)
    cnx.close()